
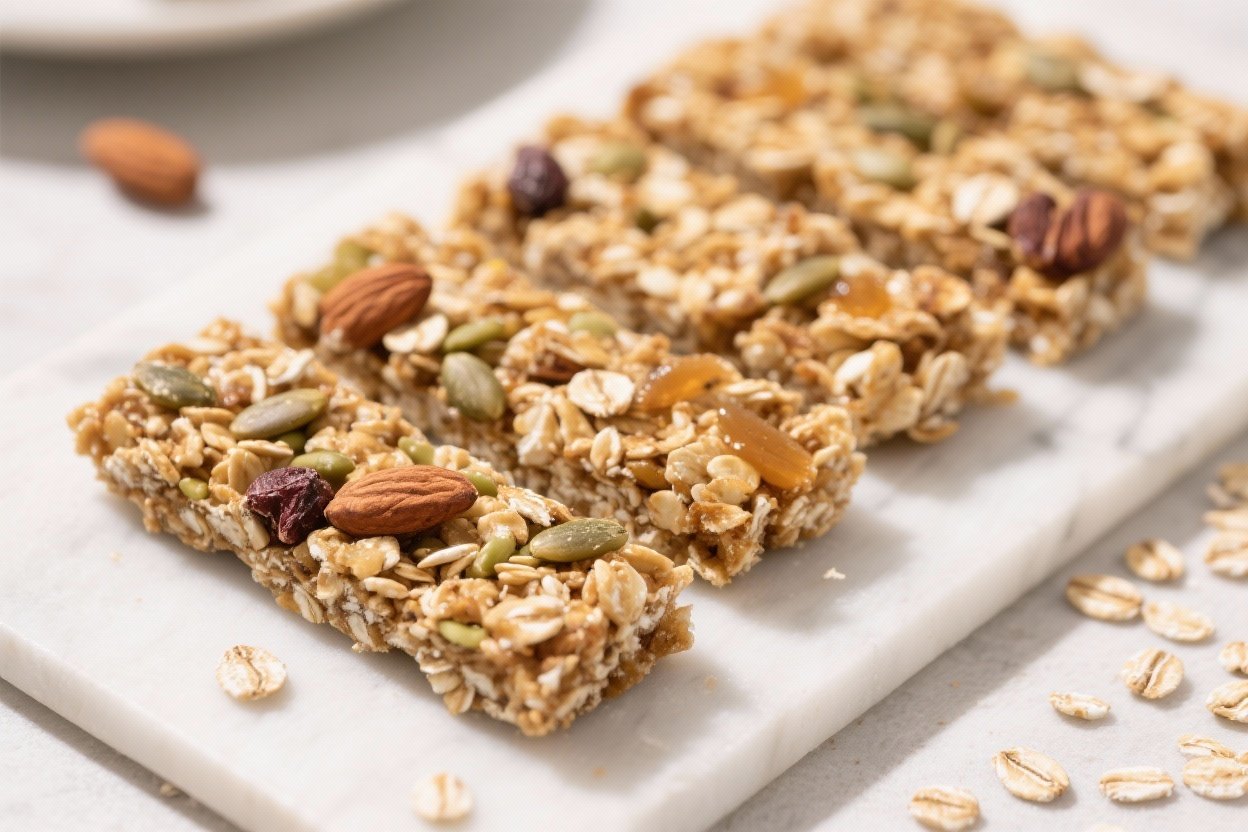
Stop Buying Snack Bars: Like Granola Bars, But Better – Easy Homemade Granola Bars (Customizable!): Oats, nuts, seeds, and natural sweeteners pressed into bars, no baking required.
You want a snack that doesn’t crash your energy or your budget? Make these no-bake granola bars in 15 minutes and watch store-bought snacks go obsolete. They’re chewy, crunchy, naturally sweet, and ridiculously customizable.
One bowl, no oven, zero excuses. Stack your pantry with these and you’ll feel like you hacked the snack aisle. And yes, they actually taste amazing—like “why didn’t I do this sooner?” amazing.
What Makes This Recipe Awesome

- No-bake convenience: Press, chill, slice—done.
No oven drama, no timing mishaps.
- Customizable to your cravings: Swap nuts, seeds, sweeteners, flavor add-ins. It’s your bar, your rules.
- Better nutrition: Whole oats, healthy fats, natural sweeteners. You control the sugar, not some mystery label.
- Perfect texture: Chewy with crunch.
Doesn’t crumble into dust or stick like cement.
- Budget-friendly: Bulk ingredients = more bars, less cash. Your wallet will clap.
What You’ll Need (Ingredients)
- 2 1/2 cups rolled oats (old-fashioned; not instant)
- 1/2 cup chopped nuts (almonds, walnuts, pecans, or a mix)
- 1/3 cup seeds (pumpkin, sunflower, chia, or sesame)
- 1/2 cup natural nut or seed butter (peanut, almond, cashew, or tahini)
- 1/3 cup sticky sweetener (honey or maple syrup)
- 2–3 tablespoons coconut oil (or melted butter for richness)
- 1/2 teaspoon fine sea salt
- 1 teaspoon vanilla extract
- Optional add-ins (about 1/2–3/4 cup total): mini chocolate chips, dried fruit (cranberries, cherries, chopped dates, raisins), shredded coconut, toasted quinoa, cacao nibs, cinnamon, orange zest.
Cooking Instructions

- Prep the pan: Line an 8×8-inch pan with parchment, leaving overhang for easy lifting. A loaf pan works for thicker bars.
- Toast for flavor (optional but worth it): In a dry skillet over medium heat, lightly toast the oats and nuts for 3–4 minutes until fragrant.
Stir frequently. Let cool slightly. FYI, this step upgrades the flavor fast.
- Mix the glue: In a small saucepan on low heat, warm the nut butter, sweetener, and coconut oil until melted and smooth.
Stir in vanilla and salt. Do not boil—just melt.
- Combine: In a large bowl, add oats, nuts, seeds, and any dry add-ins (except chocolate chips if the mixture is hot). Pour the warm mixture over and stir until everything is evenly coated and glossy.
- Mix-ins check: If adding chocolate chips, let the mixture cool a couple minutes so they don’t melt completely.
Then fold them in gently.
- Pack it tight: Transfer to the lined pan. Press very firmly with a spatula or the bottom of a measuring cup. The tighter you press, the better the bars hold.
- Chill to set: Refrigerate for 1–2 hours, or freeze for 25–30 minutes, until firm.
- Slice smart: Lift out using the parchment.
Cut into 10–12 bars with a sharp knife. For clean edges, warm the knife under hot water and wipe between cuts.
- Enjoy now or later: Eat immediately or store using the tips below. Try not to eat half the pan.
Or do. Your call.
How to Store
- Room temperature: In a cool kitchen, keep in an airtight container for up to 3 days. Separate layers with parchment.
- Refrigerator: Best for texture and longevity.
Store up to 2 weeks.
- Freezer: Wrap individually and freeze up to 3 months. Thaw 10–15 minutes or eat slightly frozen for a satisfying chew.

What’s Great About This
- Portable fuel: Great for hikes, pre-workout, kid lunches, or “my meeting should’ve been an email” afternoons.
- Balanced macros: Carbs from oats, fats from nuts and seeds, optional protein powder if you want extra oomph.
- Allergy-friendly: Go nut-free with sunflower seed butter and more seeds. Gluten-free if using certified GF oats.
- Flavor-flexible: Make them cozy (cinnamon-raisin), tropical (coconut-mango), or decadent (peanut butter–chocolate chip).
No rules, only wins.
Don’t Make These Errors
- Using quick oats only: They make the bars mealy. Stick to rolled oats for structure, or mix half-and-half if you must.
- Skipping the press: Not pressing firmly enough = crumbly bars. Pack them like you mean it.
- Overheating the binder: Boiling the nut butter/sweetener can separate the fats and make greasy bars.
Low and slow.
- Too many add-ins: More isn’t always more. Cap at about 3/4 cup of extras or the bars won’t hold.
- Cutting before set: Warm, soft mixture will fall apart. Chill first.
Patience is the price of clean edges.
Different Ways to Make This
- PB Chocolate Classic: Peanut butter, honey, mini chocolate chips, and chopped peanuts. Sprinkle flaky salt on top. Unreal.
- Cranberry Orange: Almond butter, maple syrup, dried cranberries, orange zest, and pumpkin seeds.
Add a pinch of cinnamon.
- Tropical Crunch: Cashew butter, maple syrup, coconut flakes, diced dried mango, and toasted sesame seeds.
- Mocha Almond Crunch: Almond butter, honey, cacao nibs, espresso powder, and sliced almonds.
- Nut-Free School-Safe: Sunflower seed butter, maple syrup, pumpkin seeds, sunflower seeds, and raisins.
- Protein Boost: Stir 1/4–1/3 cup vanilla or chocolate protein powder into the dry mix; add 1–2 tablespoons extra coconut oil if needed to keep it cohesive.
FAQ
Can I use steel-cut oats?
Steel-cut oats stay too hard and chewy for this recipe. Use rolled oats for the right texture. If you want extra crunch, lightly toast them first.
What if my bars are falling apart?
You likely didn’t press hard enough or didn’t use enough binder.
Add 1–2 tablespoons more honey/maple or nut butter, press firmly, and chill longer. Also don’t overload with add-ins.
How do I make these vegan?
Use maple syrup instead of honey and plant-based add-ins like dairy-free chocolate chips. Coconut oil keeps everything set without butter.
Can I reduce the sugar?
Yes, but keep at least 1/4 cup sticky sweetener for structure.
Offset sweetness by adding more spices, citrus zest, or a pinch of extra salt for flavor pop.
Do they hold up in lunchboxes?
Absolutely. If it’s warm out, wrap individually and add an ice pack. Pressing firmly and chilling overnight improves durability.
Can I use crunchy peanut butter?
Totally.
It adds great texture. If it’s very thick, warm it gently with the sweetener and oil so it mixes smoothly.
What pan size works best?
An 8×8-inch pan gives standard bar thickness. Use a loaf pan for thicker bars or a 9×13 for thinner, snack-size bars—adjust chilling and cutting accordingly.
Is there a way to make them lower in fat?
You can reduce coconut oil to 1 tablespoon and use powdered add-ins like puffed quinoa for volume.
Note: fat helps with satiety and structure, so don’t slash too hard.
How can I add extra fiber?
Mix in 1–2 tablespoons ground flax or chia seeds. If the mixture gets dry, add a splash more sweetener or 1 tablespoon water to keep it cohesive.
Can I make them without coconut flavor?
Use refined (not virgin) coconut oil for neutral taste, or swap in melted butter or avocado oil. Refined coconut oil still sets nicely when chilled.
The Bottom Line
These no-bake homemade granola bars are fast, customizable, and way better than the boxed stuff—both in taste and nutrition.
Keep the core formula (oats + nuts/seeds + sticky binder) and remix flavors to match your mood. Press hard, chill well, and you’ve got grab-and-go fuel that actually delivers. Make a batch today and watch your snack game level up, no oven required.
Printable Recipe Card
Want just the essential recipe details without scrolling through the article? Get our printable recipe card with just the ingredients and instructions.


One Comment