
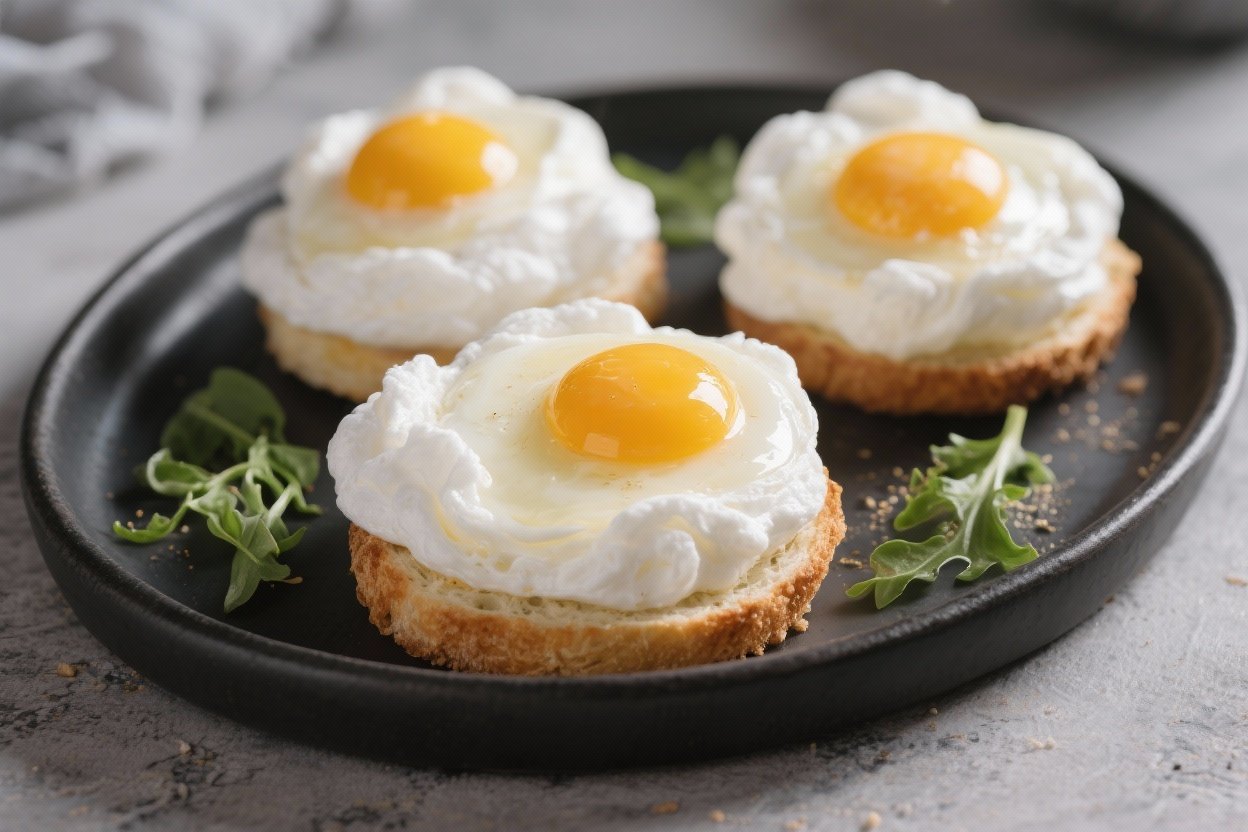
Cloud Eggs (Fluffy Separated Egg Whites & Yolks) – Light, Fun, and Fast
Cloud eggs are a playful twist on breakfast that feel special without being fussy. You whip the whites into a cloud, spoon them into little nests, then crown each one with a glossy yolk. They’re light, savory, and ready in minutes.
If you like eggs but want a fresh take on your morning routine, this is a smart way to change it up. Kids love the look, adults love the texture, and the whole thing feels restaurant-worthy with very little effort.
Ingredients
Method
- Preheat the oven and prep the pan: Heat your oven to 425°F (220°C). Line a baking sheet with parchment and lightly oil or spray it to prevent sticking.
- Separate the eggs: Carefully separate whites and yolks. Place yolks in individual small bowls or a muffin tin cavity so they stay intact. Put the whites in a clean, dry mixing bowl.
- Add stabilizer and season: Add cream of tartar and a pinch of salt to the whites. This helps them whip tall and stay fluffy.
- Whip the whites: Using a hand mixer or stand mixer, beat on medium-high until stiff peaks form, about 2–4 minutes. The peaks should stand straight up when you lift the beaters.
- Fold in extras (optional): Gently fold in cheese and herbs with a spatula. Keep a light hand so you don’t deflate the whites.
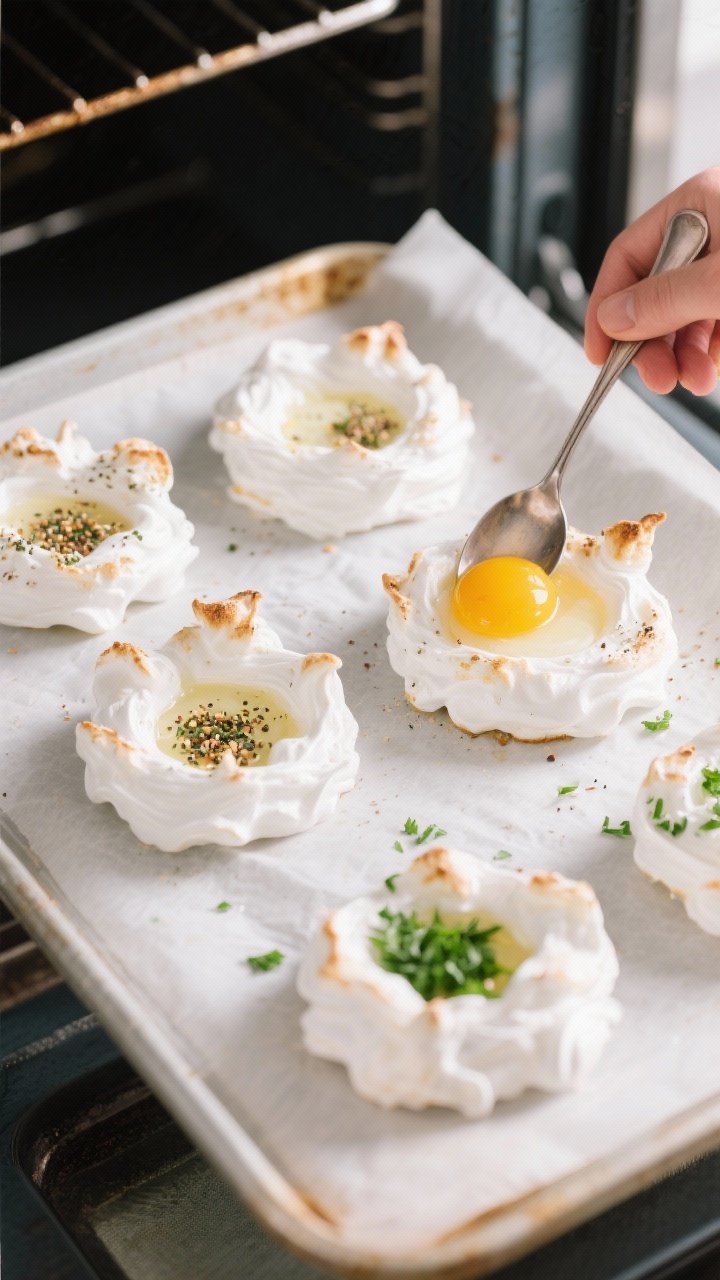
- Form the clouds: Spoon the whipped whites into four mounds on the baking sheet. Use the back of the spoon to make a small well in the center of each mound.
- Bake the whites: Bake for 3–4 minutes, just until the edges start to barely color. This sets the structure before adding the yolks.
- Add the yolks: Remove the sheet from the oven and gently nestle one yolk into each well. Season with salt and pepper.
- Finish baking: Return to the oven for 3–4 minutes more for runny yolks, or 5–6 minutes for jammy yolks. Watch closely—yolks set quickly.
- Serve right away: Slide a spatula under each cloud and plate. Add a drizzle of olive oil, extra herbs, or a pinch of chili flakes if you like.
What Makes This Recipe So Good

- Fluffy texture: Whipping the whites gives you an airy, cloud-like bite that’s surprisingly satisfying.
- Quick and simple: A handful of ingredients and about 15 minutes is all it takes.
- Customizable: Fold in cheese, herbs, or spices to match your mood.
- Looks impressive: The separated yolk-on-cloud presentation turns a basic egg into a centerpiece.
- Lighter than fried eggs: Minimal oil, big flavor, and a clean finish.
What You’ll Need
- 4 large eggs (fresh and cold separate easiest; room-temp whites whip best)
- 1/4 teaspoon cream of tartar (optional but helps stabilize the whites)
- 1/4 teaspoon fine salt
- Black pepper, to taste
- 2–3 tablespoons grated Parmesan or finely shredded cheese (optional)
- Chopped herbs like chives, parsley, or dill (optional)
- Olive oil or cooking spray, for the baking sheet
How to Make It
- Preheat the oven and prep the pan: Heat your oven to 425°F (220°C). Line a baking sheet with parchment and lightly oil or spray it to prevent sticking.
- Separate the eggs: Carefully separate whites and yolks.
Place yolks in individual small bowls or a muffin tin cavity so they stay intact. Put the whites in a clean, dry mixing bowl.
- Add stabilizer and season: Add cream of tartar and a pinch of salt to the whites. This helps them whip tall and stay fluffy.
- Whip the whites: Using a hand mixer or stand mixer, beat on medium-high until stiff peaks form, about 2–4 minutes.
The peaks should stand straight up when you lift the beaters.
- Fold in extras (optional): Gently fold in cheese and herbs with a spatula. Keep a light hand so you don’t deflate the whites.
- Form the clouds: Spoon the whipped whites into four mounds on the baking sheet. Use the back of the spoon to make a small well in the center of each mound.
- Bake the whites: Bake for 3–4 minutes, just until the edges start to barely color.
This sets the structure before adding the yolks.
- Add the yolks: Remove the sheet from the oven and gently nestle one yolk into each well. Season with salt and pepper.
- Finish baking: Return to the oven for 3–4 minutes more for runny yolks, or 5–6 minutes for jammy yolks. Watch closely—yolks set quickly.
- Serve right away: Slide a spatula under each cloud and plate.
Add a drizzle of olive oil, extra herbs, or a pinch of chili flakes if you like.
Keeping It Fresh
Cloud eggs are best eaten immediately. The whites deflate as they cool and lose that signature fluff. If you must hold them, keep them in a warm oven (around 200°F/95°C) for up to 10 minutes.
Leftovers aren’t ideal, but you can refrigerate for up to 24 hours in an airtight container.
Reheat gently at 300°F (150°C) for 5–6 minutes. Expect a softer, less airy texture.

Benefits of This Recipe
- High protein, minimal carbs: Satisfying without weighing you down.
- Flexible for different diets: Naturally gluten-free and easy to make keto-friendly.
- Budget-friendly: Eggs plus pantry staples give you a restaurant-style dish at home.
- Scales well: Double or triple for brunch without extra fuss.
- Kid-friendly: The look and texture often win over picky eaters.
What Not to Do
- Don’t get yolk in the whites: Even a little fat prevents the whites from whipping properly. Use separate bowls and add whites to the mixing bowl one at a time.
- Don’t use a greasy bowl: Residual oil or moisture will flatten your foam.
Make sure bowls and beaters are squeaky clean and dry.
- Don’t skip seasoning: A pinch of salt in the whites and on the yolks makes a big difference.
- Don’t overbake: Clouds turn tough and dry if left too long. Keep an eye on the edges and yolk set.
- Don’t fold heavy mix-ins: Large chunks deflate the whites. Choose finely grated cheese and minced herbs.
Recipe Variations
- Cheesy Clouds: Fold in 2–3 tablespoons of Parmesan, Gruyère, or cheddar.
Finish with extra cheese over the yolk.
- Herb Garden: Add chopped chives, parsley, and a hint of tarragon. Lemon zest on top brightens everything.
- Smoky Bacon: Sprinkle crisp, finely chopped bacon over the whites after the first bake. Add the yolk and finish baking.
- Spicy Kick: Mix a pinch of smoked paprika or Aleppo pepper into the whites.
Top with chili flakes or hot honey at the end.
- Everything Bagel: Dust the clouds with everything seasoning before the first bake. Serve on buttered toast.
- Truffle Touch: A light drizzle of truffle oil or a pinch of truffle salt after baking feels luxurious.
FAQ
Can I make cloud eggs without cream of tartar?
Yes. It helps stabilize the foam, but you can skip it if your bowl is clean and you whip to stiff peaks.
A few drops of lemon juice can also help.
Why won’t my egg whites whip?
There’s likely fat or moisture in the bowl or a bit of yolk in the whites. Start over with a clean, dry bowl and make sure the whites are free of any yolk. Metal or glass bowls work best.
How do I keep the yolks runny?
Bake the whites first to set, then add the yolks and finish for 3–4 minutes.
Pull them as soon as the yolks look glossy but slightly thickened.
Can I make these in an air fryer?
Yes. Air fry at 375°F (190°C). Cook the whites for about 2–3 minutes, add the yolks, then cook 2–3 minutes more.
Check early—air fryers run hot.
What should I serve with cloud eggs?
Toast soldiers, sautéed greens, avocado slices, or a simple tomato salad pair well. They’re also great on top of toasted brioche or a buttered English muffin.
Do I need to bring eggs to room temperature?
Room-temp whites whip faster and higher, but cold eggs separate more easily. Separate straight from the fridge, then let the whites sit for 10–15 minutes before whipping.
Can I make them dairy-free?
Absolutely.
Skip the cheese and use your favorite herbs and spices. The texture and flavor are still excellent.
Final Thoughts
Cloud eggs turn a simple ingredient into something fun, airy, and elegant. With just a few techniques—clean bowl, stiff peaks, and a careful bake—you’ll get perfect results.
Customize them to your taste, plate them hot, and enjoy a breakfast that looks fancy but feels effortless. Once you make them once, they’ll be in your regular rotation.
Printable Recipe Card
Want just the essential recipe details without scrolling through the article? Get our printable recipe card with just the ingredients and instructions.


One Comment