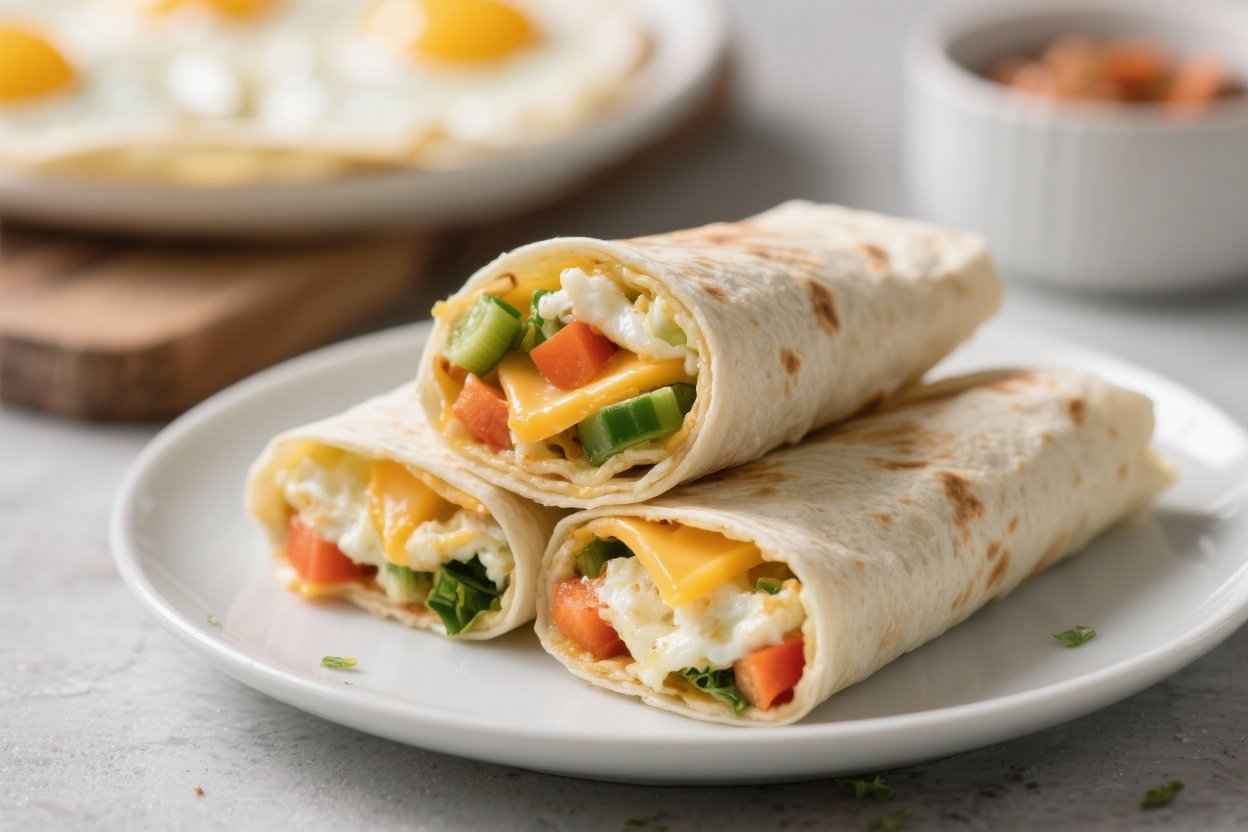
Make-Ahead Breakfast Wraps – Egg, Cheese, Veggie (Freezer-Friendly)
These make-ahead breakfast wraps are the kind of meal that helps mornings run smoother. You get a warm, satisfying wrap with eggs, melty cheese, and colorful veggies without cooking from scratch at sunrise. Prep once, freeze, and reheat in minutes.
They’re simple, flexible, and great for kids and adults alike. If your mornings are busy or you want a healthier grab-and-go option, these wraps are a reliable staple.
Ingredients
Method
- Prep the veggies. Dice the onion and bell pepper, slice the mushrooms, and chop the spinach. Keep everything in separate piles so you can cook them in the right order.
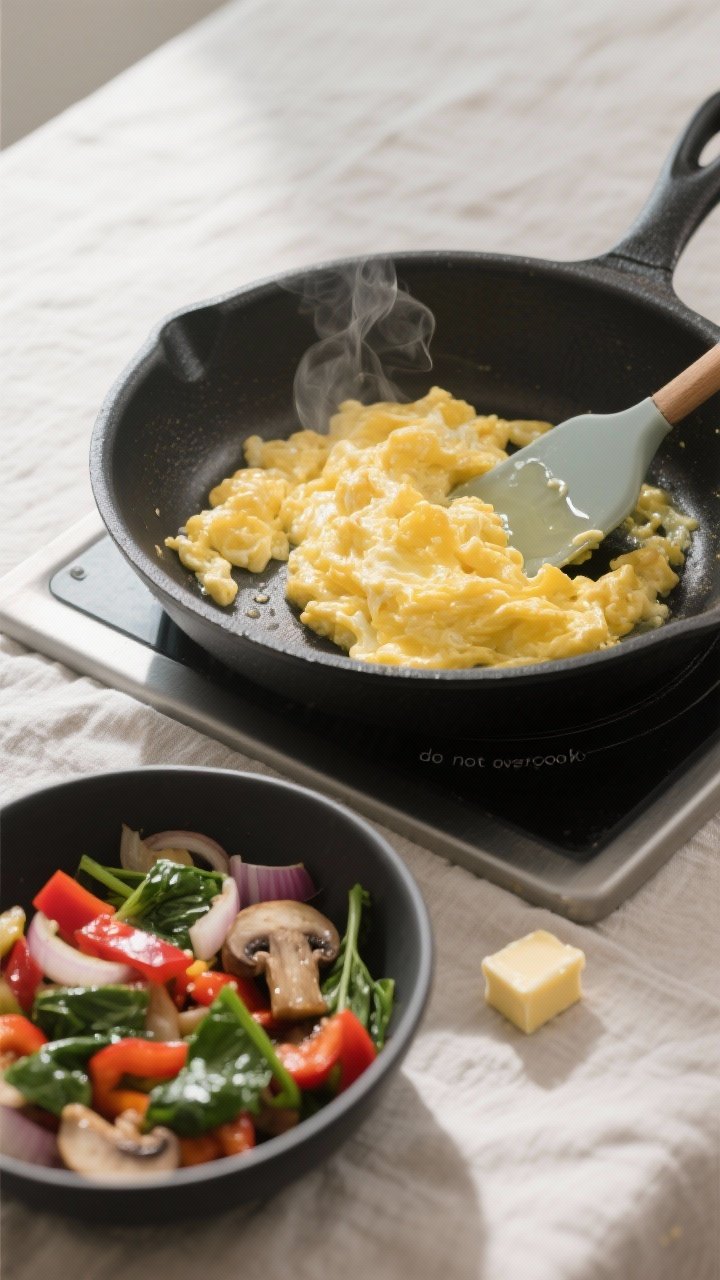
- Sauté the vegetables. Heat olive oil or butter in a large skillet over medium heat. Add onion and bell pepper with a pinch of salt. Cook 4–5 minutes until softened. Add mushrooms and cook until their moisture evaporates, about 3–4 minutes. Stir in spinach just until wilted. Transfer veggies to a bowl and wipe out the skillet.
- Whisk the eggs. In a large bowl, whisk eggs, milk, salt, pepper, and optional spices until well combined but not frothy.
- Scramble gently. Add a small knob of butter or oil to the skillet over medium-low heat. Pour in the eggs and cook slowly, stirring with a spatula until just set and slightly glossy. Do not overcook—they’ll cook a little more when reheated. Remove from heat.
- Cool the filling. Let the eggs and veggies cool for 10–15 minutes. This prevents steam from making the tortillas soggy.
- Warm the tortillas. Briefly warm tortillas in a dry skillet or microwave until pliable. This helps prevent cracking when rolling.
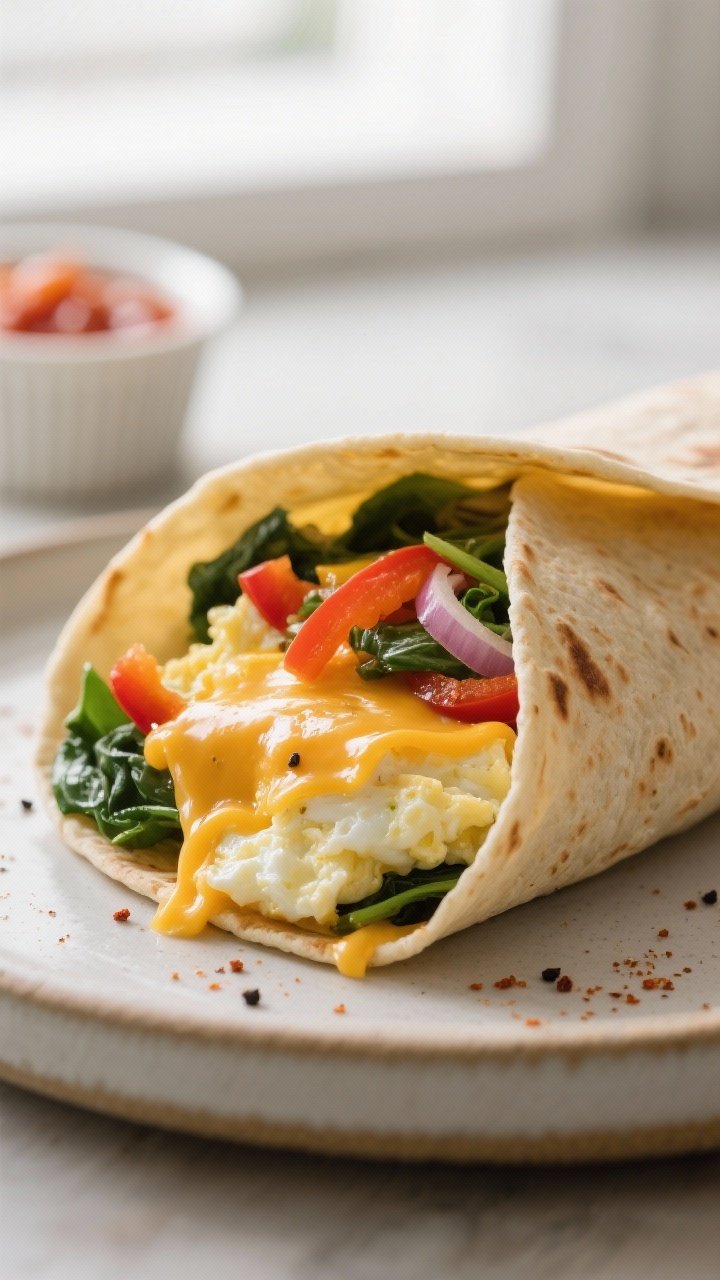
- Assemble the wraps. Lay out each tortilla. Add 1/3–1/2 cup eggs, a spoonful of veggies, and a sprinkle of cheese. Keep the filling in a line slightly off-center. Don’t overfill.
- Roll tightly. Fold the sides in, then roll from the bottom up, tucking as you go to create a snug wrap. For extra security, you can briefly sear seam-side down in a dry skillet to seal.
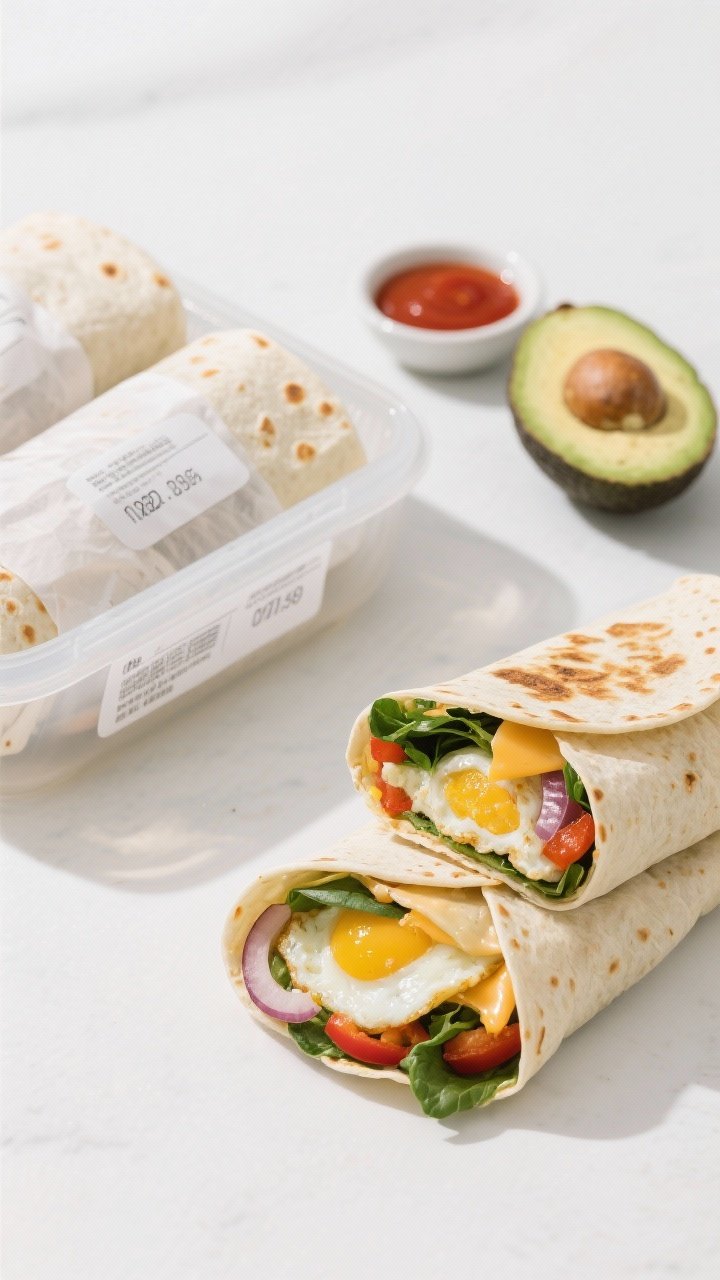
- Wrap for the freezer. Wrap each burrito tightly in parchment or foil. For best results, place the wrapped burritos in a freezer bag or airtight container. Label with the date.
- Freeze. Freeze flat in a single layer. Once solid, you can stack them. They’ll keep well for up to 3 months.
What Makes This Special
Breakfast wraps are popular, but freezer-friendly wraps that actually reheat well are game-changers. These are built with the right texture in mind so they don’t go soggy or rubbery.
They’re also customizable—use the veggies you like, swap in different cheeses, or add protein. Best of all, they’re budget-friendly, and you can make a big batch in under an hour.
Ingredients
- 10 large eggs
- 1/4 cup milk (or water) for fluffier eggs
- 1 teaspoon kosher salt, plus more to taste
- 1/2 teaspoon black pepper
- 1 tablespoon olive oil or butter
- 1 small onion, diced
- 1 bell pepper, diced (any color)
- 1 cup baby spinach, chopped
- 1 cup mushrooms, sliced (optional)
- 1 cup shredded cheese (cheddar, Monterey Jack, or mozzarella)
- 8–10 large flour tortillas (8–10 inches)
- 1/2 teaspoon garlic powder (optional)
- 1/2 teaspoon smoked paprika or chili powder (optional)
- Hot sauce or salsa, for serving (optional; add at reheat time)
Instructions
- Prep the veggies. Dice the onion and bell pepper, slice the mushrooms, and chop the spinach. Keep everything in separate piles so you can cook them in the right order.
- Sauté the vegetables. Heat olive oil or butter in a large skillet over medium heat.
Add onion and bell pepper with a pinch of salt. Cook 4–5 minutes until softened. Add mushrooms and cook until their moisture evaporates, about 3–4 minutes.
Stir in spinach just until wilted. Transfer veggies to a bowl and wipe out the skillet.
- Whisk the eggs. In a large bowl, whisk eggs, milk, salt, pepper, and optional spices until well combined but not frothy.
- Scramble gently. Add a small knob of butter or oil to the skillet over medium-low heat. Pour in the eggs and cook slowly, stirring with a spatula until just set and slightly glossy. Do not overcook—they’ll cook a little more when reheated.
Remove from heat.
- Cool the filling. Let the eggs and veggies cool for 10–15 minutes. This prevents steam from making the tortillas soggy.
- Warm the tortillas. Briefly warm tortillas in a dry skillet or microwave until pliable. This helps prevent cracking when rolling.
- Assemble the wraps. Lay out each tortilla.
Add 1/3–1/2 cup eggs, a spoonful of veggies, and a sprinkle of cheese. Keep the filling in a line slightly off-center. Don’t overfill.
- Roll tightly. Fold the sides in, then roll from the bottom up, tucking as you go to create a snug wrap.
For extra security, you can briefly sear seam-side down in a dry skillet to seal.
- Wrap for the freezer. Wrap each burrito tightly in parchment or foil. For best results, place the wrapped burritos in a freezer bag or airtight container. Label with the date.
- Freeze. Freeze flat in a single layer.
Once solid, you can stack them. They’ll keep well for up to 3 months.
Keeping It Fresh
The secret to wraps that reheat beautifully is managing moisture. Cook the vegetables until excess water cooks off, and let everything cool completely before wrapping.
Avoid wet ingredients inside the wrap, like salsa or juicy tomatoes—save those for serving after reheating. Use tortillas that are soft and flexible, and don’t overstuff them. For storage, double-wrap: parchment or foil first, then a freezer bag to prevent freezer burn.
Benefits of This Recipe
- Time-saving: Cook once, breakfast for days.
- Balanced: Protein, fiber, and healthy fats keep you full.
- Kid-friendly: Mild flavors and melty cheese are an easy sell.
- Budget-wise: Eggs and veggies are affordable and versatile.
- Flexible: Add-ons like beans, sausage, or greens fit right in.
- Portable: Great for commuting or school mornings.
What Not to Do
- Don’t overcook the eggs. Dry eggs turn rubbery after reheating.
- Don’t add watery ingredients. Skip fresh tomatoes, salsa, or sour cream inside the wrap before freezing.
- Don’t wrap while hot. Trapped steam makes tortillas soggy and prone to tearing.
- Don’t skip labeling. It’s easy to forget when you made them.
Write the date and flavor.
- Don’t overfill. Overstuffed wraps burst open and reheat unevenly.
Recipe Variations
- Southwest: Add black beans, corn, a pinch of cumin, and pepper jack cheese. Serve with salsa after reheating.
- Mushroom and Swiss: Sauté mushrooms with thyme and use Swiss or Gruyère for a savory twist.
- Spinach Feta: Add chopped spinach, sun-dried tomatoes (patted dry), and crumbled feta.
- Veggie Loaded: Zucchini, kale, and red onion—just cook them down to remove moisture.
- Bacon or Sausage: Cook, drain very well, and cool completely before adding.
- High-Protein: Add cottage cheese to the eggs while scrambling or use egg whites plus extra cheese.
- Gluten-Free: Use gluten-free tortillas and check labels on cheese and seasonings.
- Dairy-Free: Use a dairy-free cheese and swap milk with water or a neutral non-dairy milk.
How Do I Reheat From Frozen?
Unwrap the burrito and place it on a microwave-safe plate. Microwave on 50% power for 2–3 minutes, flip, then another 1–2 minutes until hot in the center.
For a crisper exterior, finish in a skillet over medium heat for 1–2 minutes per side, or use an air fryer at 350°F (175°C) for 6–8 minutes after the microwave step.
Can I Reheat in the Oven?
Yes. Keep the wrap in foil and bake at 350°F (175°C) for 25–30 minutes from frozen. For a crispier tortilla, unwrap for the last 5 minutes or sear in a skillet afterward.
How Long Do They Last in the Freezer?
They’re best within 2–3 months for taste and texture.
They’re still safe a bit longer if well-wrapped, but quality can decline.
Can I Add Potatoes?
Absolutely. Use cooked, cooled diced potatoes or hash browns. Make sure they’re browned and dry before adding so they don’t add extra moisture.
What Cheese Works Best?
Cheddar, Monterey Jack, mozzarella, or a Mexican blend all melt nicely.
Avoid very soft cheeses inside if you’re freezing, as they can get watery. If you love a tang, add a sprinkle of feta after reheating.
Do I Have to Use Flour Tortillas?
Flour tortillas freeze and reheat the best. Whole wheat works well too.
Corn tortillas tend to crack; if using them, double up and warm thoroughly before rolling.
Can I Meal Prep Just the Filling?
Yes. Store cooled eggs and veggies in the fridge for up to 4 days. Assemble fresh wraps each morning or freeze portions later.
It’s a good option if you’re short on freezer space.
How Do I Prevent Soggy Wraps?
Cool everything before rolling, cook veggies until dry, avoid wet sauces inside, and wrap tightly. Reheat gently and finish on a hot skillet for a crisp exterior.
Are These Good for Kids?
Yes. Keep spices mild and use familiar veggies like peppers and spinach.
You can cut the wraps in halves or thirds for smaller hands.
What Should I Serve With Them?
Keep it simple: salsa, hot sauce, Greek yogurt, avocado slices, or a quick fruit cup. If you’re packing lunch, add carrot sticks or a clementine.
In Conclusion
Make-ahead breakfast wraps are the kind of meal prep that actually pays off. They’re easy to assemble, freezer-friendly, and customizable for every taste.
With a few smart steps—cool fillings, dry veggies, tight rolls—you get a quick, fresh-tasting breakfast any day of the week. Stock your freezer once, and enjoy calm, delicious mornings after.
Printable Recipe Card
Want just the essential recipe details without scrolling through the article? Get our printable recipe card with just the ingredients and instructions.